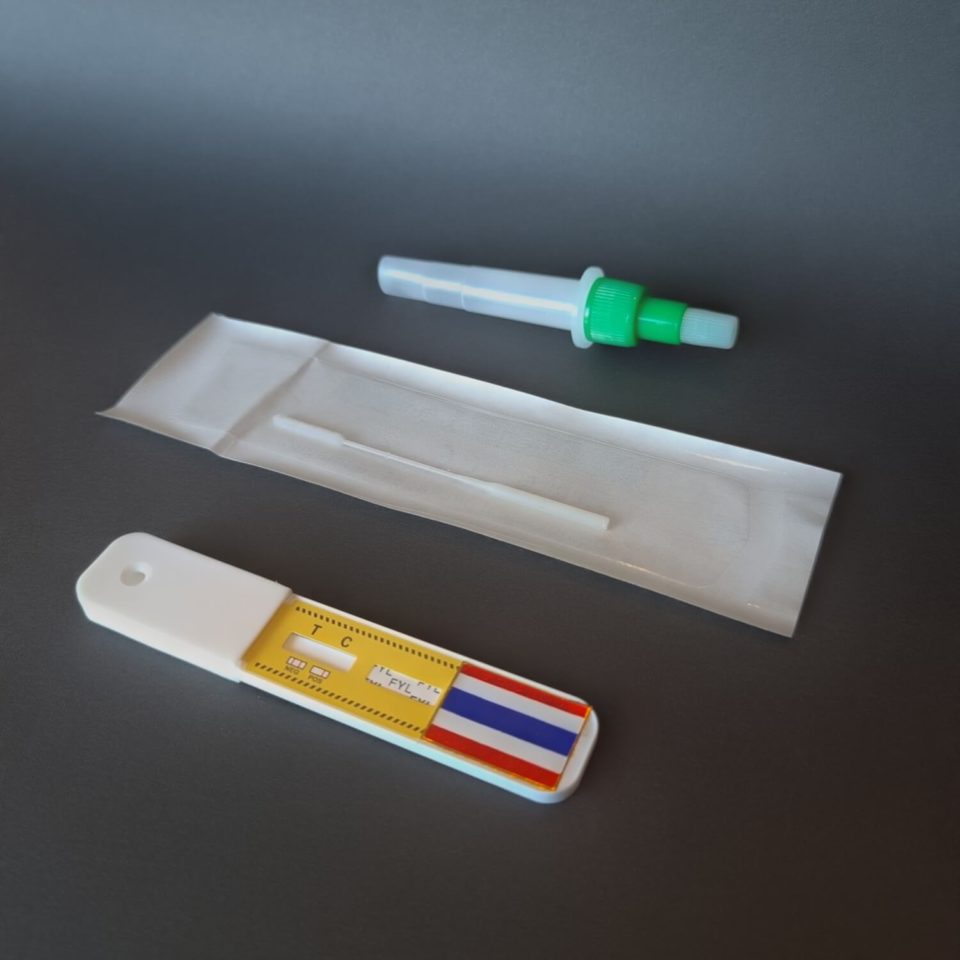
Fentanyl Detection Instructions
Principles of Identification Test
This test is a rapid immunological device for the detection and identification of presumptive drugs or their cutting products (Fentanyl in this case).
Depending on the sample and the substance sought, it can meet different needs:
- Detect invisible traces of drugs on surfaces and objects.
- Identify suspected drugs or substances presented in solid or liquid form.
- Identify cutting products, adulterants or other potentially dangerous chemical compounds.
This test is intended for laboratories, law enforcement agencies, associations working to reduce the risks associated with drug use, as well as anyone seeking to identify an unknown, suspicious or possibly harmful substance.

Performing the Sampling
Ploose choose the appropriate method of sampling based on your needs.
A. Testing cut substances
Please follow the instructions outlined here for checking the presence of Fentanyl cut or mixed into substances such as powders, tablets, crystals or liquids.
This process is intended only for this use, for other sampling methods, please choose the correct tab and process to obtain accurate results.
Step 1
Check that all the dilution liquid is at the bottom of the sampling vial (plastic with green cap) by tapping it 2-3 times against a hard surface.
Step 2
If the sample is in the form of compact pieces, powder, crystals or tablets, it is necessary to crush a small fragment and reduce it as much as possible to fine particles or powder as much as possible.
Step 2
Place the head of the swab on top of the sample and roll the swab over 4 to 5 times to cover it with the sample as much as possible.
Step 2
Unscrew and remove the large green cap from the vial.
Step 2
Insert the swab all the way into the vial and roll it around about 10 times to release the collected particles into the dilution liquid. Do not hesitate to tilt the vial horizontally, so that the liquid can cover the entire length of the head of the swab.
Step 2
Screw the large cap back on tightly and shake the vial vigorously for 10 seconds to homogenize the mixture thoroughly.
Step 2
Remove the test case from its packaging and place it on a flat, clean and dry surface.
Step 2
Unscrew the small transparent cap from the large green part of the plastic vial and pour 3-4 drops of solution into the well of the test case until you start to see the strip absorb the liquid. Note: the first couple of drops might not go in due to surface tension, so add drop by drop as necessary until the test starts to absorb the liquid.
Step 2
Wait 5 minutes before reading the result and compare the lines.
B. Testing plant samples
Please follow the instructions outlined here for checking the presence of Fentanyl on a plant sample (such as cannabis or other similar natural products).
This process is intended only for this use, for other sampling methods, please choose the correct tab and process to obtain accurate results.
Step 1
Check that all the dilution liquid is at the bottom of the sampling vial (plastic with green cap) by tapping it 2-3 times against a hard surface.
Step 2
Take 50mg (about the size of a small pea) of the sample to test.
Step 2
Unscrew and remove the large green cap from the vial.
Step 2
Using the handle of the sampling swab, press the sample firmly against the bottom and sides of the vial, then mix it vigorously with the dilution liquid until the liquid turns slightly the same color (usually green) as the sample.
Step 2
Screw the large cap back on tightly and shake the vial vigorously for 10 seconds to homogenize the mixture thoroughly.
Step 2
Remove the test case from its packaging and place it on a flat, clean and dry surface.
Step 2
Unscrew the small transparent cap from the large green part of the plastic vial and pour 3-4 drops of solution into the well of the test case until you start to see the strip absorb the liquid. Note: the first couple of drops might not go in due to surface tension, so add drop by drop as necessary until the test starts to absorb the liquid.
Step 2
Wait 5 minutes before reading the result and compare the lines.
C. Testing presence on surfaces
Please follow the instructions outlined here for checking the presence of Fentanyl on surfaces or objects (it. counters, packaging, etc.)
This process is intended only for this use, for other sampling methods, please choose the correct tab and process to obtain accurate results.
Step 1
Check that all the dilution liquid is at the bottom of the sampling vial (plastic with green cap) by tapping it 2-3 times against a hard surface.
Step 2
Unscrew the small transparent cap on the larger green cap of the vial and pour 1 drop of solution on the head of the sampling swab.
Step 2
Carefully sweep the head of the swab over the surface (or residues) to be tested, using zigzag and circular movements, while rolling the swab, in order to collect a maximum amount of particles around the head.
Step 2
Unscrew and remove the large green cap from the vial.
Step 2
Insert the swab all the way into the vial and roll it around about 10 times to release the collected particles into the dilution liquid. Do not hesitate to tilt the vial horizontally, so that the liquid can cover the entire length of the head of the swab.
Step 2
Screw the large cap back on tightly and shake the vial vigorously for 10 seconds to homogenize the mixture thoroughly.
Step 2
Remove the test case from its packaging and place it on a flat, clean and dry surface.
Step 2
Unscrew the small transparent cap from the large green part of the plastic vial and pour 3-4 drops of solution into the well of the test case until you start to see the strip absorb the liquid. Note: the first couple of drops might not go in due to surface tension, so add drop by drop as necessary until the test starts to absorb the liquid.
Step 2
Wait 5 minutes before reading the result and compare the lines.
Results interpretation
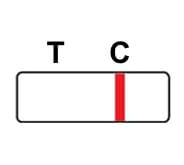
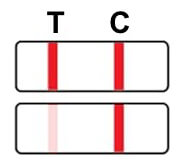
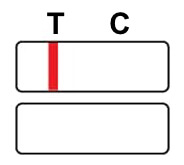
The result area has 2 lines: the control line “C” and the test line “T”.
Test Validity
Negative Test
Positive Test
Compare Results
Result
Display
Positive: contains traces found in sample.

Negative: no traces found in sample tested.

Inconclusive: test is not valid.

Storage recommendations
- Store these tests in their original packaging, below 35°C (95°F) and protected from direct sun light.
- Do not open the pouch containing the test until ready to use.
- Keep out of reach of children.
- Avoid eye, mouth, nose or skin contact with the dilution liquid in the vial, which may cause irritation (first aid measure: rinse thoroughly with water). Wearing gloves is recommended.
- Do not use after the expiration date.
Disclaimer
Regardless of the result obtained, extreme vigilance is required, as:
- The sample may contain harmful or toxic substances not identified by the test.
- It is possible that an error in procedure, handling, or the unexpected presence of interfering substances may cause an erroneous result.
- A negative result does not guarantee the absence of the sought substance, as it may be present at a concentration level below the detection limit of the test.
- This test cannot give any indication of the amount or proportion of a substance present in the sample being tested.
- No rapid test can be 100% reliable. Therefore, the results obtained by this test must imperatively be confirmed by a reference analytical method such as GC/MS and HPLC-MS/MS.
- This test is a professional device to assist in the detection and identification of presumptive drug samples or cutting products. It is not intended to test “anything and everything” (beverages/sodas/alcohols, food products, household products, phytosanitary products, cosmetics), which may contain chemical or biological compounds that could interfere with the proper functioning of the test.
- This test is not designed to work on human skin, nor on biological fluids.
For these reasons, Happy Test cannot be held responsible for any damage or accident that may result from the use of this test.